I decided to write a tutorial on designing percussion, because it’s important (p.s. if you’re wondering about the title, it was an old house track with great drums on a vinyl that I played to death). One post wont do the topic justice so this is going to be a three part series. First we’ll start with the less interesting (but still important!) interfacing with a DAW side of things. Then later we’ll do a section on tweaking the drum kit sounds, and then one on getting that killer groove going. My weapon of choice is Native Instruments’ Battery 3, but most of this will apply to any drum machine.
There are a few ways you can hook up a drum machine. You could just have one midi channel with your drumkit VST included and a midi clip playing all parts of the drumkit. The problem with this is you end up with masses of midi clips for each drum kit variation, and everything comes out of the same audio channel pre-mixed.
You could always have several drum kits open, but ideally you want as few instances of the drum machine open – unless you’ve got an eight-core beast of a machine. However, you still want to be able to trigger different parts of the drum kit separately. The most economical way is to have the drum machine on one midi channel and then have a set of midi channels which send signals to that channel. This allows you to separate out the midi clips for drums, toms, hihats etc. whilst only having one instance of the drum machine open. So the ‘drums’ midi channel only plays notes that correspond to drums, ‘toms’ notes only for toms etc. This unclutters the midi clips too, making rhythm programming easier.

Economical drum kits setup
The downfall of this is that all your drums enter the DAW on a single channel so post processing is global. This isn’t great as you may want to apply separate compression to the drums and maybe some delay to the hats. Of course, a lot of drum machines allow you to apply FX internally, so if you like the internal FX this may work for you.
If you’re not happy with that and like using other FX then try then next, more involved method…
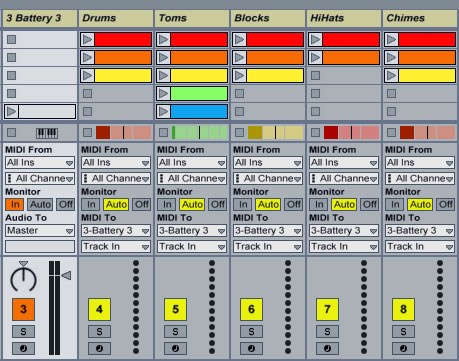
This time create a midi and an audio channel for each section of the drum kit you want to control separately. Within the drum kit you need to be quite organised. Select all of the drums and assign them an output channel (rather than everything leaving the drum machine on the master channel). Then all the toms on another channel, all the hihats on another, and so on. This will depend on your drum machine but Battery 3 has plenty of room with eight stereo channels. Now back in the DAW you should be able to assign the ‘Audio From’ on the audio channels to each of the drum machine output channels. Now, assign each group of instruments a midi channel within the drum machine. Then change the ‘Midi To’ setting on the midi channels in Ableton to trigger the drum machine and the specific midi channel (see the screenshot below). As before, the midi channels will send notes to each part of the kit, but this time the output will come back through individual audio channels. This allows you to process each part of the kit separately in your DAW e.g. using the kick for sidechain compression, or sending some of the hihat sound to a reverb.

Comprehensive drum kit setup
In the above example I’ve then used the new Live 8 ‘group’ feature that allows all the output from a set of selected channels to be sent to a group bus channel. This is useful as it allows you to get the mix right for a single group of instruments – like the percussion, or the bass sounds, or the leads. You can also add some overall effects to the group bus, like compression, to help them gel together. This makes the final mixdown much easier.
That’s enough golden nuggets for the first part. Get your DAW template set up and start building a drum kit ready for the next tutorial where we’ll talk about ways of tweaking the sounds to get punchy lows and snappy highs. Peace out.
